# Building the flow
You will be learning to use the following set of nodes in Kumologica by building the WeatherRiskReporting REST web service.
| Kumologica Node | Description |
|---|---|
| EventListener | HTTP listener node. Used to listen for incoming event. |
| Logger | Logger node. Used to write the message to logs. |
| Set Property | Used to assign values to variables. |
| Datamapper | Used for format and data transformation. |
| Switch | Used for routing the flow based on condition. |
| EventListener-End | HTTP response node. Used to send response to the invoker. |
# Steps
- Open the Kumologica Designer and click on Create a new Kumologica Project. Provide the Project Name as WeatherRiskReporting. Provide the Save to as the folder path to your project workspace in your machine.
Now you can see that the designer has opened and is having a default hello world service already on the canvas. We will not be using this default flow. We will delete this flow and built our WeatherRiskReporting service from scratch.
- Drag and drop the EventListener node from the palette on to the canvas. In the palette the node will be under General category. Double click the node to open the editor. Provide the following configuration.
Display Name :  GET /weather/report
Provider: Keep as default (AWS)
Event Source: Amazon API Gateway
Verb : GET
URL : /weather/report
2
3
4
5
- From the palette drop the Logger node on to the canvas. Double click the node and provide the following.
Display Name : Log_Entry
Level : INFO
Message : 'Request received ' & msg.header.event.Records[0].queryStringParameters.location
2
3
TIP
location is a query parameter which we will be accessing using the expression msg.header.event.Records[0].queryStringParameters.location. Learn more about message structure here.
We will now store the query parameter value from the request to a message property.
- Pick the Set-Property node from the palette and place it on to canvas. Wire the node with the logger added in previous step. Open the node and provide the following by clicking add button.
Operation : Set
Target : msg.location
Source : msg.header.event.Records[0].queryStringParameters.location
2
3
Now let's invoke the third party Weather API service to get the weather condition.
- Drag and drop the HTTP Req node to the canvas and wire it with the Set-Property node added in the previous step. Open the node and provide the following.
Display Name : Invoke_OpenWeatherAPI
Method : GET
URL : 'http://api.openweathermap.org/data/2.5/weather?zip=' & msg.location & '&appid=d018310fc953f32f6c7b98c16a984ff1'
Return : a parsed JSON object
2
3
4
TIP
The URL in HTTP Req node is a JSONata expression which will append the location message property as query parameter (zip).
We now need to route the message according to the weather condition response we got invoking the third part API. For this we will use the switch node.
- Add a switch node to canvas and wire it to the HTTP req node added in previous step. Open the node and provide the following by clicking add button.
Property :  msg.payload.weather[0].main
equals = Fog
equals = Clear
equals = Mist
Otherwise
2
3
4
5
TIP
The value for each equals needs to be string so select az from the drop down.
Now we will construct the response message when each of the weather condition.
- Drag and drop four Datamapper node for each route from switch node. Wire the datamapper node to each output terminal of the switch node. Open the node and provide the following configuration.
Datamapper for output terminal Fog
Display Name :  Mapping_Fog
Mapping :  {"Weather" : "Its foggy", "Advice" : "Drive carefully"}
2
Datamapper for output terminal Clear
Display Name :  Mapping_Clear
Mapping :  {"Weather" : "Its Clear", "Advice" : "Good day to plan for a trip"}
2
Datamapper for output terminal Misty
Display Name :  Mapping_Mist
Mapping :  {"Weather" : "Its Misty", "Advice" : "Drive carefully. Check your wiper"}
2
Datamapper for output terminal NoStatus
Display Name :  Mapping_NotAvailable
Mapping :  {"Weather" : "Not available", "Advice" : "Not available"}
2
TIP
Sample Input section can be left as default. This section is used for testing your mapping against a sample payload that you expect as input to the datamapper node.
Now as the final step we will end the flow.
- Add the Eventlistner End node to the canvas and provide the following configuration.
Display Name : Success
Payload : msg.payload
2
Wire all the datamapper output to the EventListener End node.
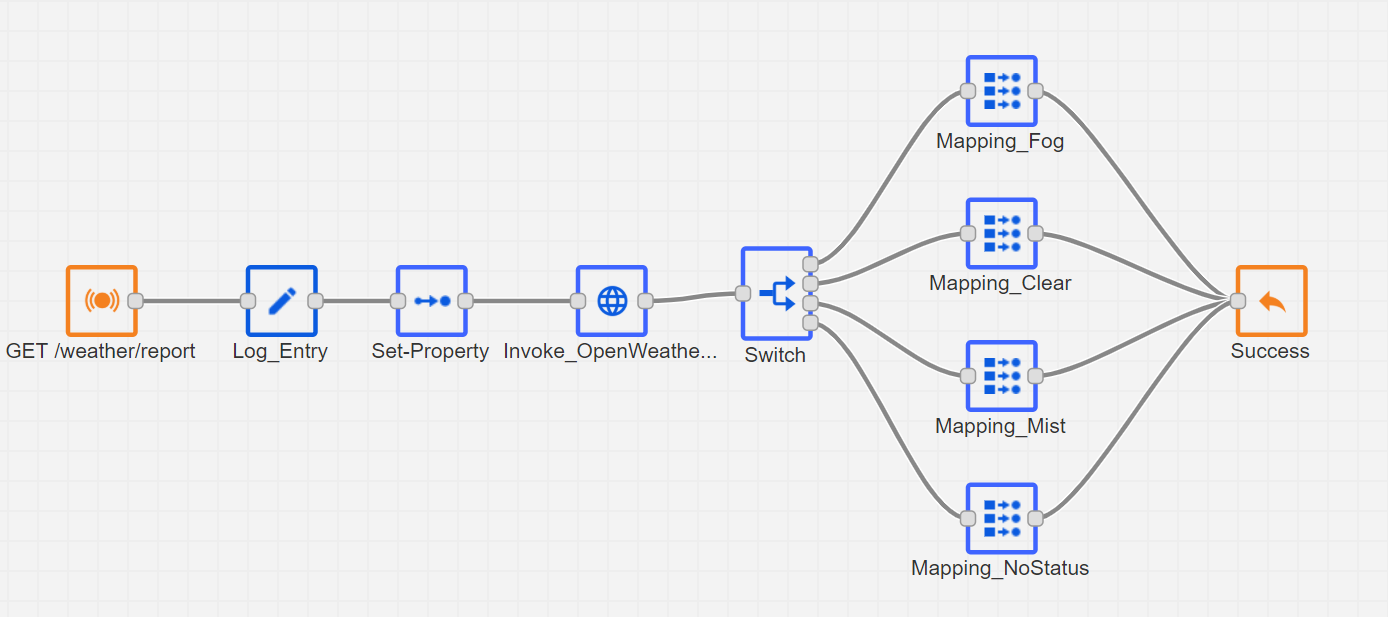
At this stage our flow will look as given below.
Now lets, build an error handling flow.
Error Handling
We will keep a very simple and generic error handling for our service.
Add a catch node with and leave all the setting as default. i.e
Catch error from : all nodesAdd a logger node and provide the following configuration.
Display Name : Log_Error
Level : INFO
Message : msg.error
2
3
Wire the logger node to the previously added catch node.
- To end the catch flow, lets add an EventListener End node and set the following configuration.
Display Name :  Failed
Status code :  500
Payload :  msg.error.message
2
3
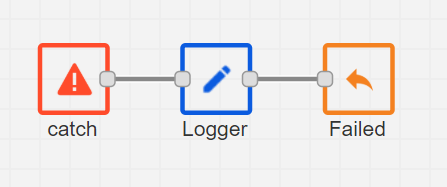
The error flow will look as given below.
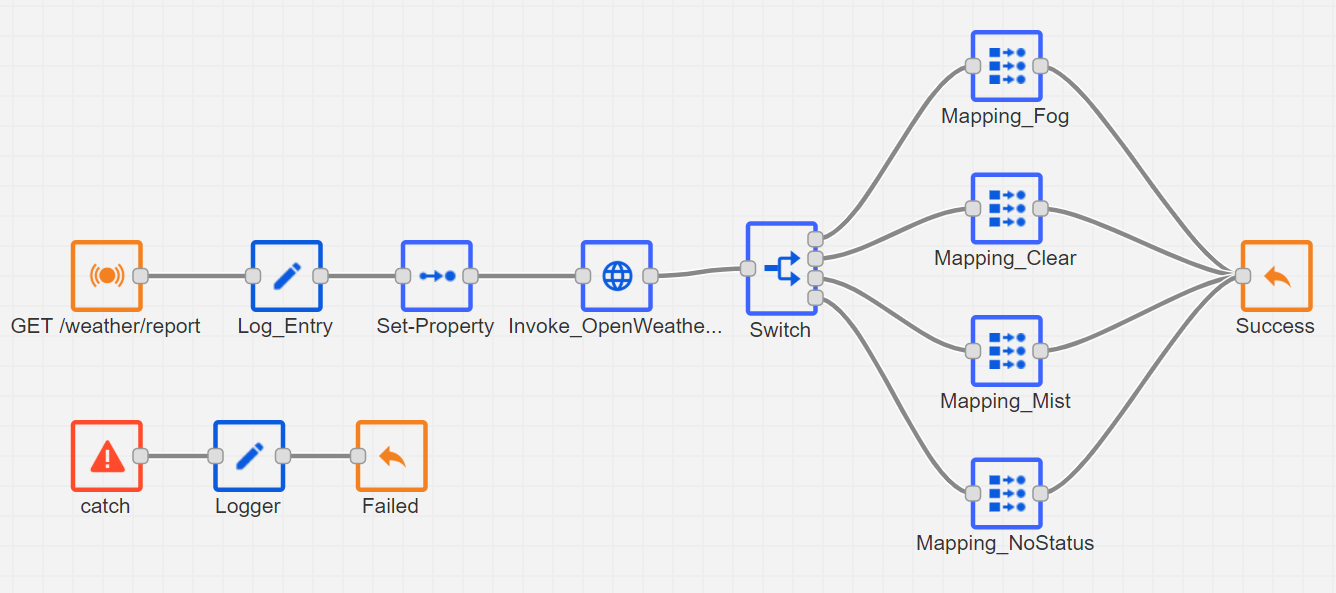
Great job!. You have now completed the development of your WeatherRiskReporting service.
Now lets test the flow.